にほんブログ村
前回は、サイト間 IPSec 接続を試しました。
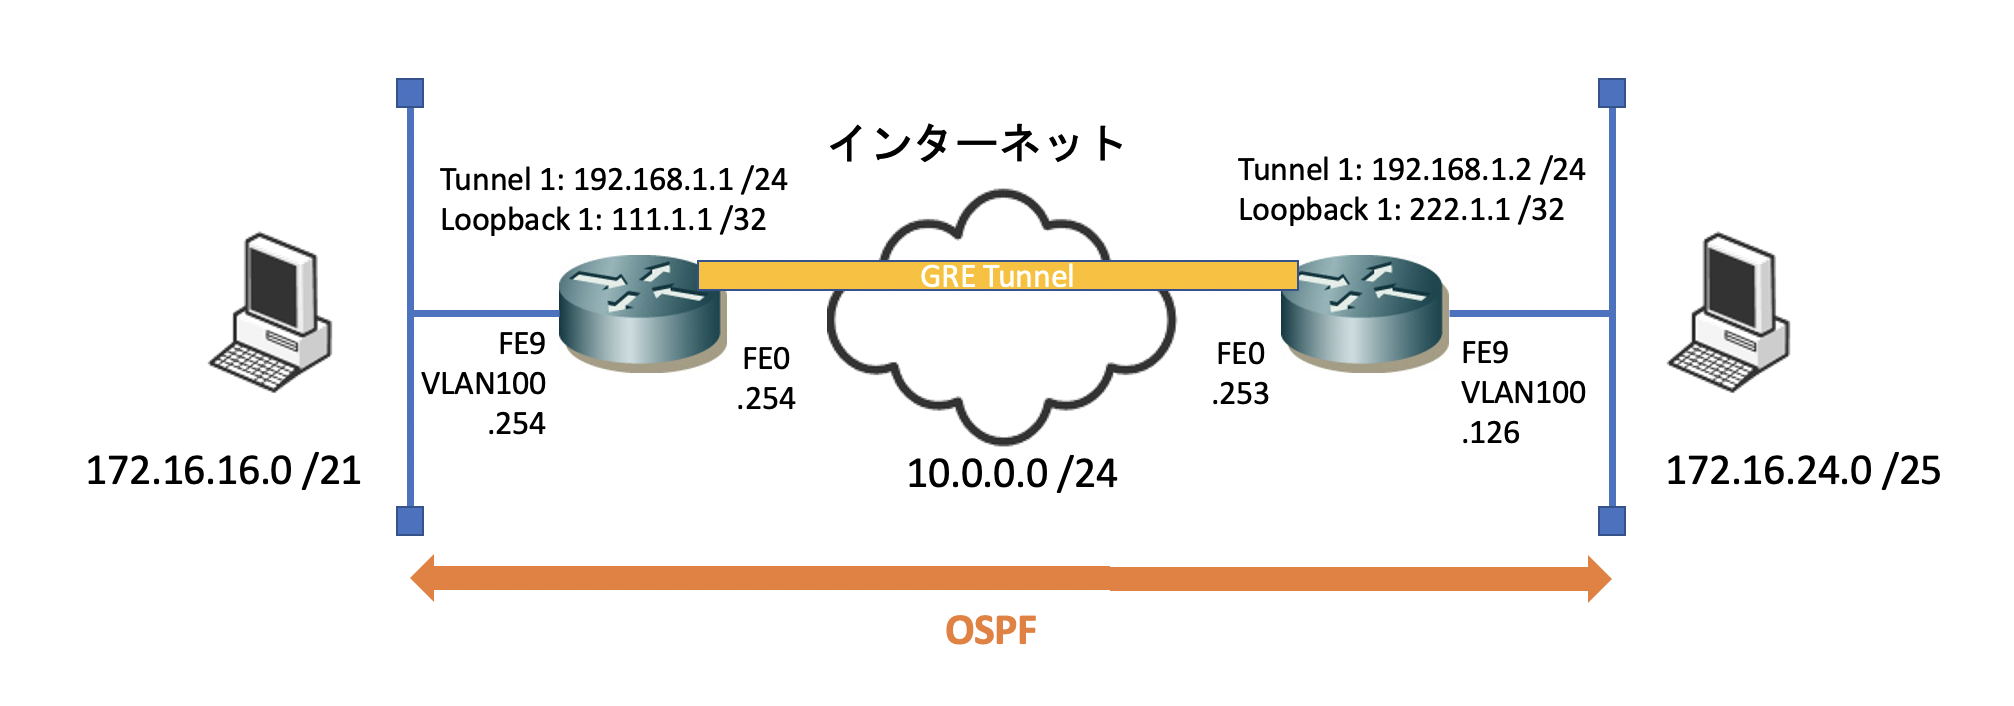
今度は、IPSec トンネルの中に GRE トンネルを通し、インターネット越しにダイナミックルーティングプロトコルのやり取りができるようにしてみたいと思います。
いわゆる GRE over IPSec というやつです。
今回は、両側のルーターで OSPF を動かし、お互いの LAN 側の経路情報をインターネット越しに交換させます。
最終系は、こんなイメージです。
GRE の設定 GRE over IPSec と聞くと、何だか難しく聞こえますが、結局やっていることは、GRE トンネルの設定と IPSec トンネルの設定です。これらを同時に使っているだけです。
まずは、GRE トンネルの設定から見てみます。
2台のルーター間で GRE トンネルを確立させるためには、Tunnel インターフェス が必要となります。
この Tunnel インターフェースで設定した IPアドレスを使って、通信をカプセリングします。カプセリングをすることにより、ダイナミックルーティングの情報がインターネット越しにできる(GRE トンネルの中を通過する)ようになります。
interface Loopback1
 ip address 111.1.1.1 255.255.255.255
 !
!
interface Tunnel1
 ip address 192.168.1.1 255.255.255.0
 ip mtu 1372
 tunnel source Loopback1 <<< 1
 tunnel destination 222.1.1.1 <<< 2
Tunnel インターフェースでは、IPアドレス以外にも設定すべき項目が 2つあります。この2つの設定も行わないと、インターフェースは Up/Up にはなりません。
Tunnel Source Tunnel Destination 1 の Tunnel Source ですが、物理インターフェースであっても、Loopback インターフェースであってもどちらでも良いです。
Loopback インターフェースはダウンすることがないですので、こちらを使った方が良いでしょう。特にインターネットルーターで、DHCP でアドレスをもらっている場合、IPアドレスが変わってしまいます。変更の度に Tunnel Source/Destinatio の設定も変えないといけなくなるので、それを避けるためにもLoopback インターフェースが良いです。
Tunnel インターフェースには、他にも色々と設定項目はありますが、上記2つが最低限必要となる設定です。
MTU は 1372 に変更しておきます。
今回の設定では、R1 の Loopback 1 インターフェースのIPアドレスを使用してます。
次に2の Tunnel Destination です。
今回は、対向側になる R2 の Loopback インターフェースの IPアドレスを指定します。
最後に、Network コマンドを使って、Tunnel インターフェースでも OSPF を有効にします。
これにより、Tunnel インターフェースが OSPF の広報をするタイミング GRE トンネルが作成され、OSPF の広報情報が GRE でカプセリングされ、OSPF のネイバーが張れます。
router ospf 1
 log-adjacency-changes
 network 172.16.16.0 0.0.7.255 area 0 <<< LAN segment
 network 192.168.1.1 0.0.0.0 area 0 <<< Tunnel 1
対向側になる R2 の設定は、こんな感じです(GRE の設定に関連する部分のみを抜粋しています)。
interface Loopback1
 ip address 222.1.1.1 255.255.255.255
 !
!
interface Tunnel1
 ip address 192.168.1.2 255.255.255.0
 ip mtu 1372
 tunnel source Loopback1
 tunnel destination 111.1.1.1
 !
router ospf 1
 log-adjacency-changes
 network 172.16.24.0 0.0.0.127 area 0 <<< LAN segment
 network 192.168.1.2 0.0.0.0 area 0 <<< Tunnel 1
これで、GRE トンネル経由で、2つのルーター間の OSPF ネイバーが張れます。
R1#sh ip ospf neighbor

Neighbor ID     Pri   State           Dead Time   Address         Interface
192.168.1.254     0   FULL/  -        00:00:36    192.168.2.254     Tunnel1
GRE over IPSec の設定 さて、いよいよ本題の GRE over IPSec の設定に入ります。
以下では、暗号化マップを使った IPSec の設定を行います。
と言っても、基本的には先ほどの GRE トンネルの設定と IPSec トンネルの設定を組み合わせるだけです。
組み合わせた時の設定のポイントですが、Crypto マップのポリシーで指定している「IPSec の対象とするアドレス 」です。
crypto map M-ipsec 1 ipsec-isakmp
 set peer 10.0.0.253
 set transform-set IPSEC
 match address A-ipsec <<< IPSec 対象アドレス
今回、A-ipsec という ACL を指定していますが、その中が以下のものです。
ip access-list extended A-ipsec
 permit gre host 111.1.1.1 host 222.1.1.1
111.1.1.1 と 222.1.1.1 を指定していますね。つまり、Tunnel インターフェースの IPアドレスです。つまり、これらのIPアドレスは、GRE トンネルの Source と Destination で指定ている IPアドレスです。
ということは、動作としては、
OSPF のネイバーを張ろうとすると、 GRE トンネルを張ろうとし、 IPSec トンネルが形成される それからGRE トンネルが形成され、 OSPF のネイバーが張れる という流れになります。
同じ考え方で R2 も設定します。
crypto map M-ipsec 1 ipsec-isakmp
 set peer 10.0.0.254
 set transform-set IPSEC
 match address A-ipsec
!
ip access-list extended A-ipsec
 permit gre host 222.1.1.1 host 111.1.1.1
これで GRE over IPSec の設定が完了です。R2 のルーティングテーブルを見てみましょう。
R2#sh ip route
Codes: L - local, C - connected, S - static, R - RIP, M - mobile, B - BGP
       D - EIGRP, EX - EIGRP external, O - OSPF, IA - OSPF inter area
       N1 - OSPF NSSA external type 1, N2 - OSPF NSSA external type 2
       E1 - OSPF external type 1, E2 - OSPF external type 2
       i - IS-IS, su - IS-IS summary, L1 - IS-IS level-1, L2 - IS-IS level-2
       ia - IS-IS inter area, * - candidate default, U - per-user static route
       o - ODR, P - periodic downloaded static route, H - NHRP, l - LISP
       a - application route
       + - replicated route, % - next hop override, p - overrides from PfR

Gateway of last resort is 0.0.0.0 to network 0.0.0.0

S*    0.0.0.0/0 is directly connected, FastEthernet0
      10.0.0.0/8 is variably subnetted, 3 subnets, 2 masks
O E2     10.0.1.135/32 [110/20] via 192.168.1.1, 00:14:09, Tunnel1
O IA     10.74.6.0/24 [110/1002] via 192.168.1.1, 00:14:09, Tunnel1
O IA     10.200.1.0/24 [110/1002] via 192.168.1.1, 00:14:09, Tunnel1
      172.16.0.0/16 is variably subnetted, 3 subnets, 2 masks
O E2     172.16.0.0/27 [110/20] via 192.168.1.1, 00:14:09, Tunnel1
O E2     172.16.0.32/27 [110/20] via 192.168.1.1, 00:14:09, Tunnel1
O        172.16.16.0/21 [110/1001] via 192.168.1.1, 00:14:09, Tunnel1
      192.168.1.0/24 is variably subnetted, 2 subnets, 2 masks
C        192.168.1.0/24 is directly connected, Tunnel1
L        192.168.1.2/32 is directly connected, Tunnel1
      222.1.1.0/32 is subnetted, 1 subnets
C        222.1.1.1 is directly connected, Loopback1
R1 の LAN 側になるセグメント情報(172.16.16.0 /21)が R2 のルーティングテーブル上で見えますね。これで GRE over IPSec の設定は完了です。
ですがここで一つ疑問が湧いてきました。
Loopback インターフェースで指定している IPアドレスって、到達不能のものであるはずなのに、GRE トンネルってどうやって張れるのだろう?
不思議だったので調べてみたら、Cisco の GRE の説明のページ に記載がありました。
有効なトンネル送信元 は、それ自体がアップ/アップ状態で、IPアドレスが設定されているインターフェースで構成されます。
有効なトンネル宛先 は、ルーティング可能な宛先です。ただし、到達可能である必要はありません。
Tunnel Destination の IPアドレスは、到達可能でなくても良いのです。なるほどです。
設定内容 R1
R1#sh run
Building configuration...

Current configuration : 2235 bytes
!
! Last configuration change at 01:30:10 UTC Wed Feb 14 2022
!
version 15.0
service timestamps debug datetime msec
service timestamps log datetime msec
no service password-encryption
!
hostname R1
!
boot-start-marker
boot-end-marker
!
enable secret 5 cisco
enable password cisco-ena
!
no aaa new-model
!
!
!
!
!
dot11 syslog
ip source-route
!
!
!
!
ip cef
no ipv6 cef
!
multilink bundle-name authenticated
!
!
!
license udi pid CISCO1812-J/K9 sn xxxxxxx
!
!
!
!
crypto isakmp policy 10
 hash md5
 authentication pre-share
crypto isakmp key vpnuser address 10.0.0.253
!
!
crypto ipsec transform-set IPSEC esp-3des esp-md5-hmac
 mode transport
!
crypto map M-ipsec 1 ipsec-isakmp
 set peer 10.0.0.253
 set transform-set IPSEC
 match address A-ipsec
!
!
!
!
!
interface Loopback1
 ip address 111.1.1.1 255.255.255.255
 !
!
interface Tunnel1
 ip address 192.168.1.1 255.255.255.0
 ip mtu 1372
 tunnel source Loopback1
 tunnel destination 222.1.1.1
 !
!
interface BRI0
 no ip address
 encapsulation hdlc
 shutdown
 !
!
interface FastEthernet0
 ip address 10.0.0.254 255.255.255.0
 duplex auto
 speed auto
 crypto map M-ipsec
 !
!
interface FastEthernet1
 no ip address
 duplex auto
 speed auto
 !
!
interface FastEthernet2
 switchport access vlan 100
 !
!
interface FastEthernet3
 switchport access vlan 100
 !
!
interface FastEthernet4
 switchport access vlan 100
 !
!
interface FastEthernet5
 switchport access vlan 100
 !
!
interface FastEthernet6
 switchport access vlan 100
 !
!
interface FastEthernet7
 switchport access vlan 100
 !
!
interface FastEthernet8
 switchport access vlan 100
 !
!
interface FastEthernet9
 switchport access vlan 100
 !
!
interface Vlan1
 no ip address
 !
!
interface Vlan100
 ip address 172.16.23.254 255.255.248.0
 !
!
router ospf 1
 log-adjacency-changes
 network 172.16.16.0 0.0.7.255 area 0
 network 192.168.1.1 0.0.0.0 area 0
!
ip forward-protocol nd
no ip http server
no ip http secure-server
!
!
ip route 0.0.0.0 0.0.0.0 FastEthernet0
!
ip access-list extended A-ipsec
 permit gre host 111.1.1.1 host 222.1.1.1
!
!
!
!
!
!
!
control-plane
 !
!
!
line con 0
 password cisco-con
 login
line aux 0
line vty 0 4
 password cisco-vty
 login
!
end
R2
R2#sh run
Building configuration...

Current configuration : 2393 bytes
!
! Last configuration change at 01:19:06 UTC Wed Feb 14 2022
!
version 15.0
service timestamps debug datetime msec
service timestamps log datetime msec
no service password-encryption
!
hostname R2
!
boot-start-marker
boot-end-marker
!
enable secret 5 cisco
enable password cisco-ena
!
no aaa new-model
!
!
!
memory-size iomem 25
!
!
dot11 syslog
ip source-route
!
!
!
!
ip cef
no ip domain lookup
no ipv6 cef
!
multilink bundle-name authenticated
!
!
!
license udi pid CISCO1812-J/K9 sn xxxxxx
!
!
vlan 100
 name home-data
!
vlan 111
 name MGMT
!
vlan 200
 name PBR-test
!
!
!
crypto isakmp policy 10
 hash md5
 authentication pre-share
crypto isakmp key vpnuser address 10.0.0.254
!
!
crypto ipsec transform-set IPSEC esp-3des esp-md5-hmac
 mode transport
!
crypto map M-ipsec 1 ipsec-isakmp
 set peer 10.0.0.254
 set transform-set IPSEC
 match address A-ipsec
!
!
!
!
!
interface Loopback1
 ip address 222.1.1.1 255.255.255.255
 !
!
interface Tunnel1
 ip address 192.168.1.2 255.255.255.0
 ip mtu 1372
 tunnel source Loopback1
 tunnel destination 111.1.1.1
 !
!
interface BRI0
 no ip address
 encapsulation hdlc
 shutdown
 !
!
interface FastEthernet0
 ip address 10.0.0.253 255.255.255.0
 duplex auto
 speed auto
 crypto map M-ipsec
 !
!
interface FastEthernet1
 no ip address
 duplex auto
 speed auto
 !
!
interface FastEthernet2
 switchport access vlan 100
 !
!
interface FastEthernet3
 switchport access vlan 100
 !
!
interface FastEthernet4
 switchport access vlan 100
 !
!
interface FastEthernet5
 switchport access vlan 100
 !
!
interface FastEthernet6
 switchport access vlan 100
 !
!
interface FastEthernet7
 switchport access vlan 100
 !
!
interface FastEthernet8
 switchport access vlan 100
 !
!
interface FastEthernet9
 switchport access vlan 100
 !
!
interface Vlan1
 no ip address
 !
!
interface Vlan100
 ip address 172.16.24.126 255.255.255.128
 !
!
router ospf 1
 log-adjacency-changes
 network 172.16.24.0 0.0.0.127 area 0
 network 192.168.1.2 0.0.0.0 area 0
!
ip forward-protocol nd
no ip http server
no ip http secure-server
!
!
ip route 0.0.0.0 0.0.0.0 FastEthernet0
!
ip access-list extended A-ipsec
 permit gre host 222.1.1.1 host 111.1.1.1
!
!
!
!
!
!
!
control-plane
 !
!
!
line con 0
 password cisco-con
 login
line aux 0
line vty 0 4
 password cisco-vty
 login
!
end
おもしろかったら、フォローしてください!
関連する記事 :Cisco ルーターでリモートアクセス VPN の設定 6月 15, 2022 FHRP を学ぶ (0) FHRP の種類 4月 2, 2022 QNAP NASのポートトランキング設定ガイド 3月 22, 2022 Cisco EEMを用いた自動化: イベント管理をマスターする 3月 6, 2022 Cisco 認定資格 CCNP の更新時期が迫ってきた 2月 16, 2022 ダイナミックルーティングのためのGREトンネル 2月 15, 2022 CiscoルーターでのIPSec VPN設定ガイド 2月 14, 2022 Cisco ルーターでダイナミック DNS を使う 1月 20, 2022 格安Cisco SFPの購入体験と設定ガイド 12月 22, 2021 静音のCisco Catalyst 2960 POEスイッチのレビュー 10月 24, 2020
最近の記事: VirtualBox インストールエラーの解決法 6月 16, 2025 複数の宛先に ping を打つことができる「fping」 3月 4, 2025 ネイティブの英語 7 “A cup of joe” 1月 12, 2025 死刑確定囚・野比のび太 – 第二十三話・昇華するのび太の鬱屈 1月 3, 2025 死刑確定囚・野比のび太 – 第二十二話・静の怒りと武の苛立ち 12月 29, 2024 死刑確定囚・野比のび太 – 第二十一話・夫婦間の亀裂とのび太の影響 12月 28, 2024 死刑確定囚・野比のび太 – 第二十話・のび太の初出勤: 恐れと葛藤 12月 28, 2024 死刑確定囚・野比のび太 – 第十九話・ジャイアンとのび太の絆 12月 21, 2024 死刑確定囚・野比のび太 – 第十八話・引きこもりの息子と家族のジレンマ 12月 19, 2024 死刑確定囚・野比のび太 – 第十七話・ドラえもんと30歳ののび太の葛藤 12月 17, 2024